레이블이 Git인 게시물을 표시합니다. 모든 게시물 표시

5월 10, 2016

commit 날짜 수정하는 법


  • author date: commit의 작성자가 commit을 작성한 날짜. commit message 안에 포함.
  • commit date: commit이 이루어진 날짜


git commit --amend --date="`date`" 사용 -> author date 가 현재 날짜로 바꿈.

GIT_COMMITTER_DATE="`date`" git commit --amend --date="`date`" -> commit date 와 author date 둘다 현재 날짜로 바꿈.


reference

5월 06, 2016

git cherry-pick 사용법

Given one or more existing commits, apply the change each one introduces, recording a new commit for each. This requires your working tree to be clean (no modifications from the HEAD commit).

다른 branch로부터 특정 commit을 가져와서 추가. 추가한 commit으로 새로운 commit이 생기며(hash값이 다름) 해당 commit에서 이루어진 변경 사항만 적용됨.

더 연구할 점

  1. reference에 따르면 cherry-pick하는 commit 만의 변경 사항을 가져올 것 같은데, 실제로는 conflict("both modified: 파일명") 가 발생하며 현재 branch와 cherry-picking branch의 공통 부모로부터 cherry-picking commit까지 모든 commit을 가져옴 (변경 사항을 누적시켜 모두 가져옴).
  2. 새로운 파일을 생성하고 만든 첫 commit을 cherry-pick하는 경우에는 merge conflict 없이 cherry-picking 됨
  3. 만약 새로운 파일을 생성하고 해당 파일을 수정하며 여러번 commit하고 이중 하나의 commit만 cherry-picking 하는 경우 conflict("deleted by us: 파일명") 발생하며 현재 branch와 cherry-picking branch의 공통 부모로부터 cherry-picking commit까지 모든 commit을 가져옴 (변경 사항을 누적시켜 모두 가져옴).

reference

4월 13, 2016

git rebase -i 사용법

rebase 과정

  1. txt 파일에 1 2 3 4 5 6 7 작성 후 각각 commit.

  2. <text 파일 내용>


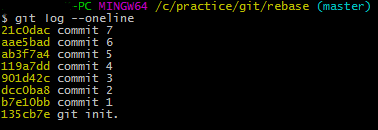
    <commit log> 

    현재 HEAD는 "commit 7"을 가리키고 있음.

  3. rebase 실행: git rebase HEAD~7 -i
    • HEAD 는 어느 commit 까지 rebase 할지를 알려주고 -i 옵션은 interactive 하게 rebase를 실행함을 의미.
    • HEAD~n 에서 n은 commit log에서 첫번째 commit까지 rebase하는 경우 1, 2번째까지 rebase하는 경우 2, ... , n번째 commit까지 rebase하는 경우 n이 됨. 즉, 위의 예시에서 "commit 7"이 HEAD~1이 됨
  4. -i 옵션으로 인해 rebase 대화창이 pop-up
    • commands를 입력해 commit 내용 편집, 삭제, 순서 변경 등의 작업을 수행. 메모장을 저장하고 닫으면 commands에 따라 rebase가 수행됨.
    • <변경 전 commit> 
      <수정 된 commit> 
    • rebase 메시지에서 commit 정렬 순서: 오래된 commit이 위쪽에, 최근에 수행한 commit이 아래쪽으로 정렬됨.
    • 병합 순서: commit이 squash 될 때는 위쪽의 commit으로 병합
    • 오래된 commit에 차곡차곡 변경 사항이 쌓임. 위의 예에서는 "commit 2" 가 "commit 1"에 병합. "commit 6" -> "commit 5" -> "commit 4"에 병합.

    • rebase 수행 후: "commit 7"
    • <commit log> 
      <text file contents> 
    • rebase 수행 후: "commit 4"
    • "commit 4"에 "commit 5,6"의 내용이 병합. 위쪽(보다 오래된 commit)에 변경 사항이 누적됨.

      <text file contents> 
    • rebase 수행 후: "commit 1"
    • "commit 1"에 "commit 2"의 내용이 병합. 위쪽(보다 오래된 commit)에 변경 사항이 누적됨.

      <text file contents> 

references

Rewriting history

3월 24, 2016

git internals: refs

refs 란?

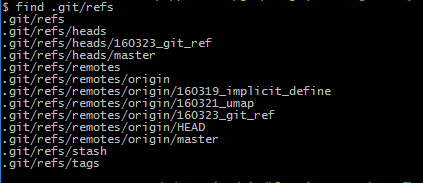
SHA-1 값을 알면 이를 통해 해당 commit 및 전체 히스토리를 살펴볼 수 있음. 기억하기 힘든 SHA-1 값 대신 외우기 쉬운 이름으로 된 파일을 만들고 파일에 SHA-1 값을 기록했는데, 이것이 git의 refs 임. 이런 refs 들은 .git/refs 디렉토리에 저장됨.

  • .git/refs/heads: local branch 이름의 파일이 생성. 파일에는 해당 브랜치에서 head가 가리키는 commit의 SHA-1이 저장됨.
  • .git/refs/remotes: remote branch 이름의 파일이 origin 디렉토리 안에 생성됨. 파일에는 해당 브랜치에서 head가 가리키는 commit의 SHA-1이 저장됨.
  • .git/refs/tags: tag 이름의 파일이 생성됨. 파일에는 해당 태그가 가리키는 commit의 SHA-1이 저장됨.

더 알아볼 것

  • git reflog
  • git update-ref

reference

3월 11, 2016

git environment initializing after installing : git 설치 후 초기 설정


user email, user name setting

git config --global user.email
git config --global user.name


push option setting

--simple / --match option 중 선택.


git's default editor setting

Visual studio code를 default editor로 설정.

git config --global core.editor="'(dir)/code.exe' -w"

-w 옵션은 editor가 종료될 때까지 git이 기다린다는 의미. git이 어떤 명령을 실행하는 중에 editor가 실행되었다면, editor가 종료된 이후에 나머지 프로세스가 진행됨.


특정 프로그램의 path를 git bash에 추가.

git을 default editor로 세팅한 이후에는 git bash에서 VS code 실행 가능. code를 통해 VS code 실행하거나 code . 명령어로 현재 폴더를 프로젝트 폴더로 지정하여 VS code를 열 수 있음. 또한 code --new-window 명령어로 empty project 상태로 VS code의 새창을 열 수도 있음.
만약 git bash에서 code 명령이 실행이 되지 않을 경우엔 git bash에 VS code의 path를 추가해주어야 함.

  1. c:\users\your_id 디렉터리에서 .bash_profile 파일을 에디터로 불러옴. 만약 파일이 없을 경우 파일을 생성.
  2. 다음 구문 추가 : alias code="dir_address/code.exe"
    ex) alias code="C:/Program\ Files\ \(x86\)/Microsoft\ VS\ Code/code.exe"
  3. 이때, 디렉터리를 구분하는 \(backward slash)를 모두 /(forward slash) 로 바꿔줌. 또한 따옴표나 (, ), space(공백) 등이 들어가는 경우 \(backward slash)를 통해 escape 처리를 해줘야 함.


references

3월 10, 2016

git branch workflow

branch의 종류

  • main branch : master, develop
  • feature branch (topic branch)
  • release branch
  • hotfix branch
main branch
  • master branch
  • 배포 가능한 상태만을 관리하는 branch. master branch에 커밋 시 태그로 버전 번호를 기록함.

  • develop branch
  • 주된 개발 활동이 일어나는 branch. 이 branch를 기반으로 개발을 진행.

feature branch

topic branch. develop branch로부터 분기해 개발을 진행함. feature branch는 공유하지 않으며, 개발이 완료되면 그 때 develop branch에 merge하여 변경내용을 다른 사람과 공유.

release branch

배포 전 최종적으로 잘 작동하는지 체크하는 branch이며 보통 branch 이름에 release-를 prefix로 붙임. 배포 하기 전 모든 기능이 잘 작동하는지 확인하고 최종적인 버그 수정을 진행하는 브랜치. 수정 사항을 모두 수정한 후 배포가 가능하게 되면 master branch에 merge하며, 해당 commit의 태그로 릴리즈 번호를 붙임. 또한 release branch 에서의 수정 사항은 master branch와 develop branch 모두에 merge해서 문제가 된 부분에 대한 수정 사항을 반영해줘야 함.


hotfix branch

배포한 버전에서 심각한 문제가 발생했을 경우 정식 개발 과정 외에 긴급히 수정하는데 사용하는 branch. 보통 branch 이름에 hotfix-를 prefix로 붙임. master branch 에서 직접 branch를 만들어 버그를 수정한 뒤 master branch에 merge. 또한 hotfix branch에서의 수정 사항은 master branch 와 develop branch 모두에 merge해서 문제가 된 부분에 대한 수정 사항을 반영해줘야 함.


references


3월 02, 2016

git log

Synopsis

git log [<options>] [<revision range>] [[\--] <path>...]

commit log를 보여주는 명령. commit log 의 출력 포맷을 직접 설정하거나 각 commit 간의 차이점을 출력하는 등 출력 결과를 다양한 방식으로 커스터마이징 할 수 있음.

Options

  • -p
  • 각 commit의 diff 결과를 보여줌.

  • -<number>
  • -n <n은 숫자>
  • 가장 최근의 n개까지의 commit log만 보여줌.

  • --since=<date1>
  • --until=<date1>
  • date1 에서 date2까지의 commit log를 보여줌

  • --author=<pattern>
  • --committer=<pattern>
  • commit의 작성자/committer가 pattern과 일치하는 commit log만 보여줌

  • --graph
  • commit log를 그래프로 표시함.

  • --pretty=<options>
  • 출력 결과를 option에 따라 보기 좋게 출력함.

    • oneline
    • short
    • medium
    • full
    • fuller
    • format:string

2월 12, 2016

git stash : 작업 내용을 임시로 저장

descriptions

작업 도중 다른 브랜치의 작업을 해야 하는데 작업한 변경 사항을 commit을 하고 싶지는 않을 때, 지금까지 작업한 변경 사항을 잠시 저장하는 기능.


사용법

지금까지의 작업을 저장 : git addgit stash

가장 최근에 stash 된 내용을 불러옴 : git stash pop

tags

  • list : stash 된 목록을 보여줌
  • show STASH_NAME : 특정 stash(STASH_NAME)의 자세한 내용을 보여줌.
  • save MY_STASH_NAME : MY_STASH_NAME 이라는 태그로 작업 내용을 stash. ex) git stash save mystash
  • pop : 가장 최근에 stash된 작업본을 불러옴. 불러온 내용은 stash 목록에서 삭제됨.
  • apply STASH_NAME|stash_number : stash 목록에서 지정한 작업본을 불러옴. pop과는 달리 원하는 작업본을 지정하여 불러올 수 있으며, 불러온 작업본이 삭제되지 않음.
  • ex) git stash apply stash@{2}
  • drop STASH_NAME|stash_number : stash 목록에서 지정한 작업본을 삭제함. ex) git stash drop MY_STASH
  • clear : stash 목록을 모두 삭제함.

stash를 remote에 push하거나 share 할 수 있을까?

reference

1월 04, 2016

git branch 조작법

Local branch

  • local branch 이름 수정
  • git branch -m old_branch new_branch

  • remote branch를 local branch로 가져온 후 track
  • git checkout -b new_local_branch remote_branch_path

  • 모든 local branch들을 한번에 remote repository에 업로드
  • 주의! remote repository가 지저분해질 수 있음
    git push --all  git push --tags
    git push 로는 branch만 올라갈 뿐 tag는 올라가지 않음. 따라서 tag는 따로 올려줘야 함.

  • git checkout -t remote_branch_path
  • remote_branch_path를 tracking 하는 local branch를 만들고 checkout. 이 방법으로 새 local branch를 만들 시 branch의 이름은 remote branch의 이름과 동일하게 만들어짐.

Remote branch

  • remote branch 삭제
  • git push origin :old_branch or git push origin --delete romote_branch // remote branch 삭제 git fetch --all --prune // 각 local machine에서 실행. to get rid of obsolete tracking branch 제거 remote branch를 삭제해도 다른 local machine들에서는 여전히 삭제된 remote branch를 tracking 하고 있는 상태. obsolete tracking을 막기 위해 다른 local machine에서 실행 git remote rm remote_branch 랑 차이점..? 이건 remote branch가 삭제됐다고 자동으로 알려주는건가?

12월 27, 2015

Adding Git Wiki locally


Git의 wiki는 기본적으로 git에 저장된 일반적인 repos. 와 동일하게 취급됨.

해당 프로젝트 폴더 내에 프로젝트명.wiki 라는 이름으로 repos.가 존재. GitHub에서 wiki tab에서 이 repos.의 주소를 확인할 수 있음.
이 repos. 주소를 이용해 프로젝트의 일반적인 repos. 를 local에 clone하는 방법과 동일한 방법(git clone 사용법)으로 local에 wiki의 local repos.를 생성할 수 있음.

참조

Adding and editing wiki pages locally |GitHub Help

12월 25, 2015

Git 유용한 명령어 모음

branch 조작


    기타

    Git branch workflow

    Branch의 종류

    • master(항상 존재)
    • 최종 릴리즈된 브랜치

    • develop(항상 존재)
    • 개발 중인 코드

    • feature
    • 특정한 기능을 구현하고자 할 때 develop branch로 부터 꺼냄. 해당 기능의 개발이 완료되면 develop branch로 merge.

    • release
    • masster 브랜치로 merge 하기 전 최종 점검을 하는 branch.

    • hotfix
    • release 버전에 버그 등 긴급한 수정 사항이 있을 경우


    참고

    3.4 Git Branching - Branching Workflows |git-scm
    Git 기본개념과 사용법 그리고 어플리케이션 |Slideshare 39페이지부터. git branch 종류별 역할.
    Git branch stregagy & case study |Slideshare

    12월 14, 2015

    Github에서 프로젝트 공유 (git clone 사용법)

    (프로젝트를 저장하려는 폴더에서) git clone repos._URL

    프로젝트용 폴더를 따로 생성할 필요 없으며, git clone 실행 시 프로젝트 폴더가 자동으로 생성되고 그 안에 파일들이 위치됨

    12월 11, 2015

    프로젝트 시작 시 Git 초기화 프로세스

    일반적인 프로젝트를 생성한 후 git에 올릴 때

    1. 새로운 local git repository를 생성
       -> (git으로 올리려는 폴더 안에서) git init
           .git 파일이 생성됨.

    2. git에 push할 때 무시할 파일과 각종  설정 사항들을 세팅
       -> .gitignore, .gitattributes 파일 작성

    3. github 등 remote server에 새로운 git remote repository를 생성
       -> 해당 사이트에서 새로운 repository 생성. ropos.의 주소를 클립보드에 복사

    4. git local 에 git remote server의 주소를 등록
       -> git remote add origin url(클립보드에 복사해둔 주소)
       ex) git remote add origin https://github.com/id/repos. name.git

    5. local git repos.에서 remote git repos.로 최초 push 시엔 새로운 upstream을 생성해줘야 함
       -> git push --set-upstream origin branch_name
       ex) git push --set-upstream origin master
    error: src refspec master does not match any.
    error: failed to push some refs to 'https://github.com/id/repos. name.git'
    >First commit을 하지 않은 상태에서 push를 해서 발생한 오류. 아무 파일이나 생성해 commit 한 후 push 하면 사라짐.
    http://stackoverflow.com/questions/5802426/git-error-src-refspec-master-does-not-match-any

    6. 이후부터는 remote repos.에 push 시에 git push 사용


    Visual studio 소스제어(git)로 프로젝트 생성 시엔 .git, .gitignore, .gitattributes 파일이 이미 생성되 있음
       -> 1,2번 건너뛰고 3번부터 시작.